mains

lunchbox life: kale and white bean enchiladas with goat cheese

image1(9)

This week’s lunch is a great example of a vegetarian high protein meal. From the kale to the white beans to the high fiber and protein tortillas, you’ve got a winner with these enchiladas.

After two weeks of salads, I decided to mix it up this week with a warm and spicy treat. The goat cheese and cilantro add a nice flair to the hearty kale, onion, and bean filling. Speaking of filling, you won’t miss the meat or large amounts of cheese from this meal because the kale and beans will keep you full all afternoon long. Enjoy!

Kale and White Bean Enchiladas with Goat Cheese

1 bunch of kale, stems removed and chopped

1 red onion, peeled, halved, and sliced into thin half moons

1 14 oz. can cannellini beans, drained and rinsed

1 Tbsp. olive oil

1 Tbsp. apple cider vinegar

1 Tbsp. cumin

1 Tbsp. chili powder

1 Tbsp. garlic powder

1 tsp. paprika

1 tsp. cayenne pepper

1 tsp. coriander

1 tsp. salt

1/2 tsp. pepper

10 high fiber, low carb tortillas (I like La Tortilla Factory brand)

19 oz. can enchilada sauce

4 oz. goat cheese

1/3 cup chopped cilantro

Heat the oven to 375 F. In a large pan, heat the olive oil and spices over medium high heat. After about 1 minute, add the sliced red onion and stir to evenly combine. When the spices begin to stick to the bottom of the pan, add the apple cider vinegar to deglaze the pan and scrape up all of the spicy bits on the bottom. Let the onions cook down for about 2 more minutes, then add the kale  and toss to combine. Let the kale cook and wilt for about 2 minutes, then add the beans and toss. Turn off the heat.

In a baking dish, pour half of the enchilada sauce on the bottom. Place the tortillas in the microwave for about 20 minutes to increase pliability, then begin assembling the enchiladas. Scoop about 1/2 cup kale mixture and place in the center of the tortilla. Fold in the left and right sides, then roll up from the bottom to the top. Do this for all ten tortillas and place them close together in the baking dish. Pour the other half of the enchilada sauce over the enchiladas, then use your fingers to pinch off 1 tsp. pieces of goat cheese and evenly distribute them over the enchiladas. Bake for 30 minutes, take out of the oven, add the cilantro, then let cool for about 30 minutes before dividing them up by two in your five containers.

meatless monday: butter bean falafel pitas

image(59)Happy Monday, folks!  Hopefully your week is off to a better start than mine.  This morning began with an intention of a great attitude, but when I got to school and realized I left my lunch on the counter, that noble aspiration dashed away.  Add typical Monday readjustments and the “what goes up must come down” folly of having a great weekend, today was not my favorite.  I did, however, manage to find some shoes and jewelry for this weekend’s Taste of the Arts: Studio 54 event, and my day was mostly salvaged by taking some time to cook in my kitchen.  I did some meal prep yesterday when I was putting together my lunches, so this afternoon was met with only a few tasks before supper was on the table.

Falafel is a delightful Middle Eastern street food in which many vegetarians and omnivores delight.  Usually made with chickpeas, these beany balls of fried goodness are best enjoyed wrapped in a pita or on their own with a side of tangy tzatziki sauce.  For a southern twist, I used butter beans and lady peas (same mixture as the salad from this week’s lunches) in place of the chickpeas, and it worked beautifully.  This falafel is full of similar flavors from the traditional take: tahini paste, lemon juice, fresh mint and parsley, and of course, garlic.  They are fried in vegetable oil, drained, then tucked into pita pockets with lots of crisp romaine lettuce, ruby red farm tomatoes, thinly sliced cucumber and radishes, salty feta, fresh parsley, and drizzled with tzatziki. Check out this lovely mise en place I did before I dressed the pitas:

image(60)

These pitas are so filling that you’ll think you cheated at Meatless Monday!  They’re also very easy to make.  Don’t let the deep frying intimidate you; because the falafel balls are pre-cooked and aren’t meat, you won’t have to worry about cooking the meat to a specific temperature.  All you’ll need to watch is the golden brown exterior that looks like it will give your falafel a nice crunch on the outside.

Butter Bean Falafel Pitas

Serves 2-4 people

1 1/2 cups cooked butter beans

2 Tbsp. tahini paste

juice of 1 lemon

1/2 cup fresh parsley

1/4 cup fresh mint

5 garlic cloves, paper removed

1/2 tsp. salt

1/4 tsp. pepper

about 1/3 cup flour

32 oz. canola or vegetable oil

4 pita pockets

1 small tomato, sliced

2 radishes, thinly sliced (sub red onion if you like)

1/4 of one English/hothouse/seedless cucumber, thinly sliced

4-8 leaves of romaine lettuce

2-4 oz. feta, crumbled

any additional fresh parsley

for tzatziki sauce: 4 garlic cloves, 1/4 of one English/hothouse/seedless cucumber, 1/3 cup fresh parsley, 1 cup 0% Greek yogurt, juice of 1 lemon, 1/2 tsp. salt

In a food processor, combine butter beans, tahini paste, garlic, lemon juice, parsley, mint, salt, and pepper until a dough forms.  Remove mixture from the food processor and form about 16 golf ball sized balls.  Place falafel balls on a plate, cover with plastic wrap, and refrigerate for 4 hours or overnight.

When you’re ready to cook the falafel, heat oil in a deep, heavy bottomed pot over medium-high heat.  While the oil is heating, roll the falafel in the flour to coat them.  When the oil is ready, drop about four falafel balls in per batch and cook until golden brown (about 4 minutes for each batch).  Place cooked falafel on a paper towel-lined plate.

In the meantime, combine tzatziki ingredients together in a food processor to combine.

To assemble the pitas, tuck 1-2 romaine leaves into each pocket, then dress with a few slices of tomato, cucumber, radish, and parsley.  Place about 3 falafel balls in each pocket, then sprinkle with feta and drizzle with tzatziki.  Enjoy!


lunchbox life: mexican quinoa bowls

image(48)Welcome back to school, gang!  Back to school means back to school lunches, so this is the official fourth semester of lunchbox life.  I started Instagram-ing my lunches in January 2013, then we started the blog in April 2013, so happy fourth semester of lunchbox life to everyone!

This week’s plan includes a stellar list of healthy and seasonal items: quinoa (the super grain), black beans, zucchini from our CSA, and local Silver Queen corn.  After an indulgent weekend of eating in Athens (watch for a blog post about that trip soon!), I knew I needed a restart in the healthy eating department.  The quinoa and black beans are excellent sources of protein in this meatless lunch, plus I’ve added mushrooms and Cotija cheese to round out this healthy and filling dish.

You could eat this bowl as a cold salad, or you could heat it in the microwave as a burrito bowl, or you could do both and figure out which way is your favorite throughout the week.  Today, I ate it cold and thought it was fantastic.  It has a pasta salad or rice salad feel, and the flavors from the Mexican seasoning really stand up to the ingredients in this dish.  As always, feel free to modify the recipe based on your preferences.  I added cilantro and green onion because I enjoy the brightness of flavor, but you could always leave them out or substitute fresh oregano or parsley.

WW info: 5 servings at 10 PP each–a complete meal, for sure!

Mexican Quinoa Bowls

1 1/4 cup quinoa, uncooked

3 cloves garlic

1 can black beans, drained and rinsed

1 large zucchini, diced

1/2 lb. white mushrooms, sliced

3 ears Silver Queen Corn

1 Tbsp. olive oil

1/2 tsp. red pepper flakes

zest of three limes (use juice in dressing)

4 oz. Cotija cheese, diced (you could also used crumbled queso fresco)

2 green onions, thinly sliced (optional)

1/2 cup cilantro, chopped (optional)

salt and pepper

Dressing:

juice of three limes

2 Tbsp. olive oil

2 Tbsp. organic taco seasoning (seriously buy the organic–the lack of extra preservatives is worth the extra cents)

Cook the quinoa according to package directions, and throw in the peeled garlic cloves to the pot or rice cooker.  Preheat the oven to 400 F.  Toss the diced zucchini and sliced mushrooms in the olive oil, red pepper flakes, and about 1/2 tsp. salt and 1/4 tsp. pepper.  Arrange them in a single layer on a cookie sheet and roast for 20 minutes, flipping the vegetables at the 10 minute mark.  Lightly char the corn on a grill pan, then slice the kernels off.

When the quinoa is cooked, add it to a large bowl along with the black beans, lime zest, corn kernels, zucchini, and mushrooms; toss to combine.  Next, add the dressing ingredients together and either whisk them in a small bowl or shake them in a small jar.  Add the dressing to the quinoa mixture and allow the quinoa to soak up the dressing.  Next, add the cheese, green onions, and cilantro.  Refrigerate for four hours or overnight.

recipe remix: chicken chilaquiles verdes

Image

Have you ever tried chilaquiles?  Chilaquiles (chee-lah-KEE-lays) is a Mexican dish that is very similar to nachos, and nachos were requested for Recipe Remix by Autumn Cole, so here we are!

The base for chilaquiles is tortilla chips, just like nachos.  Instead of being doused in queso dip (which we all know is delicious), chilaquiles features chips simmered in a rojo or verde sauce.  If you order chilaquiles from a restaurant, you have no idea of what’s in the sauce.  If you make the sauce yourself, you can control the sauce and make sure you have a delicious, plant-based sauce for your enjoyment.  Chilaquiles allows the chips to simmer for a short time in the sauce rather than being drenched with cheese which cuts down on the negative nutrition and pumps up the positive stuff.  It’s also very easy to make, and you too can create your own chilaquiles for a simple weeknight supper without any of the overindulgence.

Nutrition info: 11 Weight Watchers Points Plus, or about 550 calories.  Compare that to double or triple what you’d get with nachos!  Another tip: since you’re controlling how many chips you prepare, you won’t mindlessly eat past the serving size.  You’re welcome. 🙂

Chicken Chilaquiles Verdes

Serves 2

1/2 lb. chicken breast, cut into chunks

30 thick, yellow corn tortilla chips (don’t get the thin style, they’ll disintegrate)

8 tomatillos, husks removed

2 poblano peppers

1 jalapeno pepper

4 garlic cloves

1 cup fresh cilantro, plus some for garnish

2 limes, juice and zest

1 oz. cotija cheese or queso fresco, crumbled

salt and pepper to taste

Bring two medium pots of water to a boil.  In one, add a dash of salt and the chicken and cook for about 30 minutes.  In the other, add the tomatillos and cook for about 5 minutes.  While the tomatillos are cooking, either roast the poblanos in the oven or char them over a gas range.  Remove the charred skin with a paper towel, then cut off the stems and remove the inner seeds.

For the sauce, add the tomatillos, poblanos, jalapeno, lime juice and zest, garlic, and cilantro to a food processor or a blender and process until smooth.  When the chicken is ready, remove it from the water, shred it with your hands or two forks, and add it to the sauce.  Pour the sauce into a medium pan and stir to combine, then gently add the tortilla chips and stir.  Heat the pan over medium heat and allow the dish to bubble just a bit (about 5 minutes).  Turn off the heat and top with the cotija or queso fresco and any remaining cilantro.  Divvy the pan up between two people and serve with a simple green salad.  Enjoy!

Image

recipe remix: slimmed down chicken pot pies

Image

Thanks to friend Jessica Northenor, colleague Jennifer Blackwell, and my mother Donna Andrews, I now have a slimmed down version of chicken pot pie–and you do, too!

The #2 recipe remix is chicken pot pie, and I hope that it will be one of your new favorites.  My first thought with this dish was dread–what is chicken pot pie without the buttery, flaky crust?  I couldn’t possibly imagine a version without it, so I decided to cheat a little bit–by putting it only on the top and not lining the ramekin with it, I could still include my favorite part without totally wrecking a healthy eating plan.  I also cut out some of the richness in the filling by using 1% milk and less flour.

Typically, chicken pot pie includes the following staple veggies: onion, carrot, celery, green beans, and peas.  I used my CSA box as a guide and included the following in my recipe: onion, carrot, peas, kale, potatoes, and parsnips.  The addition of kale helped to round out this dish’s nutritional value, and let’s be honest: I love any excuse to include kale in a dish.  Don’t even get me started on this super food: loads of vitamin K, folic acid, fiber, and we know that any dark leafy green is a nutritional green light.

Let’s get started, shall we?  First, you make the soup base:

Image

Next, you cut out the puff pastry for the tops.  According the the Pepperidge Farm package, 1/6 of a sheet is one serving, so I cut each out like so:

Image

Next, I rolled them out to cover the lids of the ramekins I bought today at Robinson HomeRobinson Home is a fantastic kitchen store in downtown Macon, so if you live here, you should go there…like yesterday.  If you don’t live here, you should check out their website to order all things wonderful for your kitchen.  Next, I covered the soup-filled ramekins with the puff pastry and gave them a quick egg wash, then placed them in the oven at 400 degrees until they were golden brown.

Image

I coupled the pot pies with a simple green salad with beautiful watermelon radishes from our CSA.  They add the perfect pop of color to any salad, and just enough of a spice and crunch to compliment softer greens.

Nutritional breakdown: 13 Weight Watchers Points Plus, which roughly translates to about 650 calories.  Most pot pies are double this (1300+) because of more pastry and more full-fat dairy in the base.

Slimmed Down Chicken Pot Pies

Serves 8

5 bone in , skin on chicken thighs

6 garlic cloves

1/2 cup water

1/4 cup all purpose flour

1 1/2 cups chicken broth

4 cups 1% milk

1 tsp. dried thyme

1 tsp. dried sage (or 1 Tbsp. fresh, chopped)

1 tsp. dried rosemary (or 1 Tbsp. fresh, chopped)

1 tsp. dried oregano (or 1 Tbsp. fresh, chopped)

1 tsp. dried chives (or 1 Tbsp. fresh, chopped)

1 cup carrots, diced

1/2 cup parsnips, diced

1/2 onion, diced

1 cup green peas, fresh or frozen

2 potatoes, diced

2 cups kale, cut into ribbons

1 1/3 sheets Pepperidge Farm puff pastry

1 egg

salt and pepper

Remove skin from chicken thighs and set aside.  Place chicken thighs in a large pot, add 1 tsp. salt, 3 garlic cloves, and the chicken skins, cover with water, and bring to a boil.  When the water is boiling, place a lid on the pot and turn the heat down to simmer.  Let cook for about 40 minutes.  When the time is up, drain the chicken and set aside to cool.  When chicken is cooled, discard the chicken skin and shred the chicken with your hands; discard of the bones.  Set shredded chicken aside.

Whisk together 1/2 cup water with 1/4 cup flour and set aside.  In a large pot, combine chicken broth and milk and bring to a boil.  When liquid is boiling, add the carrots, parsnips, onion, herbs, and 2 tsp. salt and 1 tsp. black pepper.  Place a lid on the pot, but leave a small vent between the lid and the pot; simmer for 20 minutes.  Next, add the diced potatoes and kale.  Cook for about 5 minutes, then add the chicken.  When the chicken is added, whisk in the water and flour mixture.

Preheat the over the 400 F.  Using kitchen scissors or a knife, cut the puff pastry sheets into 1/6 pieces.  roll each piece out to cover the lid of the oven-safe bowl or ramekins you’re using.  Ladle soup into each ramekin, then place the puff pastry pieces on top of them.  Whisk an egg into a small bowl and brush each puff pastry top with the egg wash.  Using a small knife, cut a 1-inch slit in the center of the puff pastry.  Place in the over for about 7-10 minutes, or until the puff pastry browns.  Plate each ramekin on a plate with a green salad and enjoy.

wildcard wednesday: hot tamales, Mississippi Delta style

Image

OK, so as soon as Alex declared April’s Wildcard Wednesday theme to be the Mississippi Delta, we knew that one of us had to try tamales.  If you’ve ever been to the region, you know that catfish is king, but hot tamales are also a delicious roadside treat.  Many barbecue joints in the Delta also sell hot tamales, and even though many of us might only associate this foodstuff with Mexican food, you should also know that its an integral part of Mississippi Delta food culture.  You can read more about this strange and wonderful connection at the Southern Foodways Alliance website.

A few words on tamales: they’re not difficult to make, but it is an undertaking an time-consuming.  They’re also delicious and totally worth it.

I made these on a Wednesday afternoon (that continued into that evening…) while Alex was at a meeting, but when I make them again, I’m going to make sure that we’re both home or that I invite over a few friends to help with the process.  I also broke a rule I usually live by: never serve dinner guests something you’ve never made before.  Our friends Frank and Heather Pendergast came over for a tamale supper last Wednesday, and the company was grand!  I think the tamales were pretty grand, too.

Mississippi Delta Hot Tamales

Makes 2 dozen

24 corn husks (available at Mexican food stores–Macon people, go to El Carnaval on Pio Nono Ave.)

4 lbs. pork shoulder, cut into large cubes (about 1.5 inch x 1.5 inch)

1 Tbsp. cumin

2 tsp. red pepper flakes

1 Tbsp. salt

1 Tbsp. paprika

1 jalapeno, quartered

1/4 cup canola oil

1 Tbsp. chili powder

2 tsp. paprika

2 tsp. salt

1/4 tsp. black pepper

1/4 tsp. cayenne pepper

1 tsp. onion powder

1 tsp. garlic powder

1/4 tsp. cumin

4 cups masa mix (finely ground cornmeal, available at most grocery stores)

2 tsp. baking powder

1 tsp. salt

3/4 cup lard (yes, I said lard–it’s worth it in this recipe!)

4 cups meat broth (from cooking the pork)

First, place the corn husks in a clean sink and fill up with warm water; let sit for about two hours.

Next, place the cubes of pork, cumin, red pepper flakes, salt, paprika, and jalapeno in a large, heavy pot and fill with water until it covered the pork.  Bring to a boil, then place the lid on the pot, turn the heat down to low, and cook for about 2 hours.  After the 2 hours time is up, remove the pork from the water and let cool for about 10 minutes.  When the pork has cooled slightly, shred the meat with your hands (this should be relatively easy).  In a large pan, heat the canola oil over medium-high heat and add the chili powder, paprika, salt, pepper, onion powder, garlic powder, and cumin to the oil and stir.  Add the shredded pork and cook for about 8 minutes, then turn off the heat and set aside.

Next, mix the masa, baking powder, salt, and lard with your hands until the mixture is evenly combined.  Add about 1/2 cup of the meat broth at a time until the dough resembled a mashed potato consistency.

Next is assembly.  Take a soaked corn husk and place the thin edge toward you and the wide edge at the top of your assembly space.  Take about 1/4 cup of the masa dough and thinly spread it in the middle of the husk.  Next, take about 1 Tbsp. of the pork and place it down the middle of the dough, then gently (think sushi here) roll the corn husk so that the masa mix forms a protective layer around the meat, then tuck the thin edge under and keep the top open.

Image

This takes a while, but once you have all of the tamales assembled, place them open-side up in a large pot so that there are enough tamales for them to stand up with the support of the other tamales.  Being careful to not spill water into the tamales, fill the pot with water up to the part of the corn husks where the masa ends.  Bring to a boil, then place the lid on the pot, turn the heat down to low, and cook for a little over an hour.

In the Mississippi tradition, I served these tamales with some slaw and beans, the quintessential barbecue sides.  Enjoy!


lunchbox life: lazy spinach lasagna

Image

Let me just say that some Sundays are perfect for lunchbox prep: I’ll have the whole day to run errands and cook as I please, get the creative juices flowing, and come up with something novel or out of the box.  Today was not one of those Sundays.  We had a lovely weekend in Helen for a friend’s wedding, rushed back to town this afternoon and went straight to our Sunday TV Dinner Group for a viewing of episode 4 of True Detective, and while were there had an absolutely delicious, handcrafted, authentic lasagna made by our friend Adam.  He made his own pasta, sauce, and meatballs, and it was glorious.  By the time we got home, I checked our CSA delivery box for inspiration and found some gorgeous large, leafy spinach.  This type is very different from your standard plastic bag or box of baby spinach, but you could certainly use that here.  I thought back to one of first dishes Alex made for me: spinach lasagna.  At this point, opportunity met inspiration, but I knew that I didn’t have the time or energy do a homemade lasagna justice, so that’s why you’re getting my quick and easy, shortcuts included recipe.  One of the biggest shortcuts is the no boil lasagna noodles.  They’re really pretty good and they’ll save you a lot of time.  Another shortcut is the crushed tomatoes.  For a sauce like this, I’d normally doctor it up with some roasted garlic, herbs, and red pepper flakes, but the mildness of the tomatoes works well here with the creaminess of the ricotta and mozzarella and the infusion of the garlic in the filling.

This recipe is also great because once you quickly assemble the lasagna and place it in the oven, you can do other Sunday night rituals (laundry, shower, organization for the week, etc.).  I’ve cut this lasagna into six pieces, but you could certainly make your pieces larger or smaller depending on your appetite.

Lazy Spinach Lasagna

4 no cook lasagna noodles

28 oz. crushed tomatoes

1 1/2 lb. part-skim mozzarella, sliced 1/4-inch thick

32 oz. part-skim ricotta cheese

3 to 4 cups spinach, torn into pieces

1 egg

1 tsp. salt

3 garlic cloves, minced or grated

Shredded parmesan cheese, for topping

Heat the oven to 375 F.  Soak the lasagna noodles in warm water for about 4 minutes, then remove from water and set aside.  In a medium sized bowl, mix the ricotta, spinach, egg, salt, and garlic until evenly combined.  In an 8×8 baking dish, place one of the lasagna sheets on the bottom and spread 1/3 of the ricotta mixture onto it, then add about 1/4 of the mozzarella, then about 1/4 of the crushed tomatoes.  Repeat x2, then on top of the fourth lasagna sheet, spoon on the last 1/4 of the tomatoes and top with the last 1/4 of the mozzarella.  Bake for about 45 minutes or until dish is bubbling and cheese begins to turn golden.  Let rest for at least 30 minutes before cutting into serving pieces.  Top with shredded parmesan and enjoy!


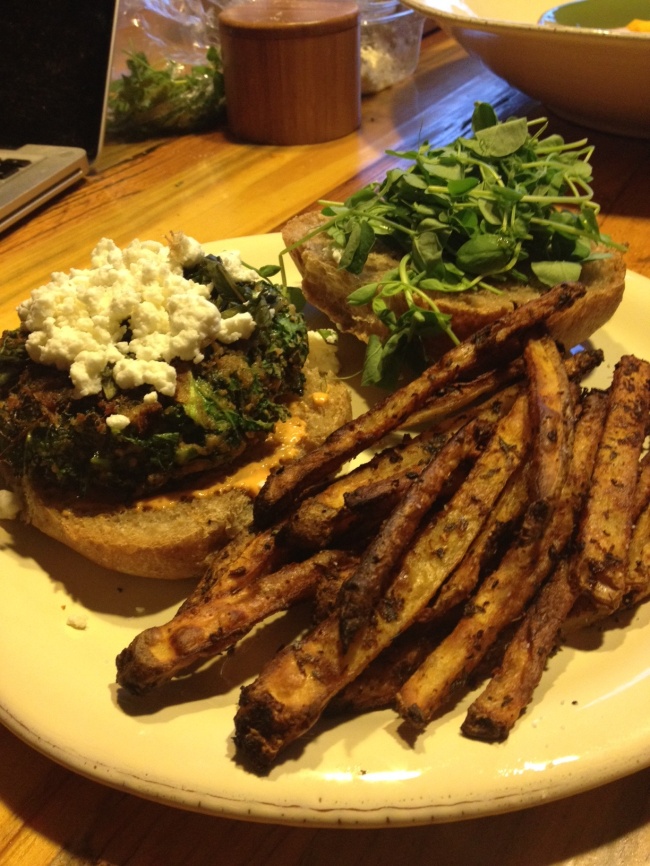
meatless monday: mushroom kale burgers with seasoned oven fries

Image

It’s back!  Meatless Monday has been on hiatus for most of the past school year because my Monday nights have been occupied by a year-long, once per week class as I work toward my gifted certification.  Since I’m on Spring Break this week (can I get a what what?), I decided to bring it back as a teaser for its fabulous return in mid-May.  Have you missed it?

For my first day of spring break, I woke up around 8 (sleeping in for a teacher), drank coffee and watched the Today Show, went to the grocery store, met my friend Lauren at Pure Barre, then ate popcorn for lunch as we watched Divergent at the movie theater.  I’d definitely call it a success.

I also had some time to peruse Pinterest and found a few different cool recipes for a mushroom kale burger.  The word “burger” is a misnomer here, but the word “patty” just sounds so…unappetizing?  Anyway, if you’re into black bean burgers or other veggie burgers, this is definitely a winner.  Every ingredient is intentional and natural, and it packs a huge nutritional punch.

The oven fries were a personal challenge.  I’m usually averse to baked fries because they just make me wish I had fried fries, but I am now a believer!  These fries are a Skinnytaste recipe, so I should have known they’d be great; Gina never gets it wrong.  I did change a couple of things though, as you’ll see below in the recipe.

Mushroom Kale Burgers

Serves 4

1 bunch kale

1 tsp. Kosher salt

2 portobello caps, stems and gills removed, cut into 1-inch pieces

1 tomato

1 Tbsp. almond butter

3 garlic cloves, peeled

1/2 tsp. cumin

1/2 tsp. paprika

1/2 tsp. cracked black pepper

1/2 tsp. Kosher salt

1/2 cup all purpose flour

1/2 cup breadcrumbs

2 Tbsp. canola oil

Rinse the kale with cold water, then remove stems from kale leaves and give the kale a rough chop into mini bite-size pieces.  Place the kale in a large mixing bowl, sprinkle with 1 tsp. salt, then massage the kale leaves with the salt (only about 30 seconds).  At first, you’ll think that this is way too much kale for four burgers, but you’ll see that it wilts slightly with the salt and folds in nicely with the other ingredients.  Quarter the tomato, remove the seeds, and place the quartered pieces in a food processor.  Add the mushrooms, almond butter, garlic, paprika, cumin, salt, and pepper, then pulse until smooth.  Add the flour and pulse again until smooth.  Fold the mushroom mixture into the kale in the large mixing bowl, then fold in the breadcrumbs.  Divide the mixture into four even amounts and, with you hands, form each amount into a patty shape.  Lightly sprinkle both sides with flour.  Heat the oil in a large, flat-bottomed pan over medium heat.  When the oil is hot, place the burgers in the pan and cook for about 5 minutes on each side.  Serve on a bun with any toppings you like–here, I used goat cheese, pea shoots, basil, and some sriracha mayo.

Seasoned Oven Fries

Adapted from Skinnytaste

Serves 2

2 medium potatoes

2 tsp. Kosher salt

2 tsp. olive oil

1 Tbsp. herbs de provence

zest of 1 lime; reserve the juice for the end

1/4 tsp. oregano

1 tsp. paprika

1/4 tsp. chili powder

1/4 tsp. onion powder

1/4 tsp. garlic powder

1 tsp. Kosher salt

1/4 tsp. cracked black pepper

Preheat the oven to 400 F.  Slice the potatoes lengthwise in 1/4-inch slices, then slice each slice vertically every 1/4-inch.  Place the raw fries in a colander over a mixing bowl and sprinkle the 2 tsp. salt evenly; let this sit for about 30 minutes.  This allows for some of the moisture from the potatoes to release, allowing for a crispier fry.  While the fries are dehydrating a bit, add all of the spices together in a small bowl and mix to combine.  When the 30 minutes are up, Combine the fries and olive oil in a mixing bowl, then add the spice mixture and toss to combine evenly.  Line a cookie sheet with aluminum foil, spray with cooking spray, then place the fries in a single layer.  Bake for about 25 minutes, turning the fries at the halfway mark.  When they are ready to eat, squeeze the lime juice over the fries for a kick.

I served these with sriracha mayo, which is just 1 part sriracha to 3 parts mayo (so 1 tsp. sriracha for every Tbsp. of mayo).

wildcard wednesday: shiitake, brussels, and carrot stuffed shells + salad with avocado and cumin viniagrette

Image Image

So, I’m still technically following the Wild Card Wednesday rule (use the theme or ingredient for the month), but the avocado was not center stage tonight.  I’m still on a high from our CSA delivery, and I couldn’t wait to use some more of those beautiful ingredients (shoutout again to my newest obsession, The Dirt Farmer CSA).  I thought about using some of these ingredients on a pizza or in a casserole bake, but then I had a throwback moment to one of my mom’s go-to weeknight suppers: stuffed shells.  I remember her boiling the pasta shells, then lining the cooked pieces on a paper towel on the counter while she mixed the filling and delicately placed a spoonful into each one.  She usually used ricotta and mozzarella for the filling and sometimes included some ground meat or sausage.   I decided to use some quick-sauteed veggies in my version mixed with part-skim ricotta and basil, and I think it turned out great!

The salad features some locally grown salad greens, a few edible flowers (a CSA throw-in this week and a total luxury), some avocado, a few pistachios, and the belle of the ball: cumin vinaigrette.  You might think that cumin only belongs in Mexican and Indian food, but add it to some lemon juice, zest, and some olive oil and you have a bright, complex flavor that works in fantastic contrast to the creamy avocado and crunchy pistachio.  This vinaigrette would be great on many salads and would also work nicely drizzled over a fatty fish like salmon or a lean skirt steak.  It’s so easy, and that you have to try it!  Don’t be afraid to make your own salad dressings.  If you have some olive oil, a small mason jar, and an imagination, the possibilities are endless.  Plus, a homemade dressing will always taste better than something out of a squeeze bottle.

Shiitake, Brussels, and Carrot Stuffed Shells

Serves 2 with leftovers

12 large pasta shells

1 cup part-skim ricotta cheese

8 to 10 brussels sprouts

1 large carrot (or about 10 very tiny carrots like the ones I received in my CSA box)

1 cup shiitake mushrooms

1 Tbsp. butter

28 oz. crushed tomatoes

4 garlic cloves, peeled and minced

1/4 cup grated parmesan cheese, plus more for a top off at the end

2 Tbsp. fresh basil cut in ribbons, separated into two 1-Tbsp. piles

salt and pepper

Preheat the oven to 400 F.  Cook the pasta according to package directions, remove from boiling water, then set aside on a paper towel to cool.  While the water is boiling and pasta is cooking, work on prepping the vegetables: Thinly slice the brussels sprouts by placing each one stem side up, then thinly slicing the sprout on all four sides (you’ll be left with the dense core to throw out).  Peel the carrots into thin ribbons with a vegetable peeler.  Add the shiitake mushrooms to the chopped brussels and carrots.  Heat a medium frying pan over medium-high heat and melt the butter, then add the veggies with 1 tsp. salt and a few grinds of black pepper.  Gently toss the veggies in the warm butter, then continue to stir every 30 seconds or so until the veggies cook through a bit (about three minutes) but do not lose all of their crunch.  Set aside to cool.  While the veggies are cooling, heat the crushed tomatoes in a small saucepan over medium heat with the minced garlic and 1 tsp. salt.  When the veggies are warm but not longer hot, add the ricotta, parmesan, and 1 Tbsp. of the basil, then stir to combine.  Using a small baking dish, add about 1/2 cup of the tomato sauce to the bottom of the dish.  Next, fill each pasta shell with about 1/4 cup of the ricotta-veggie mixture and line the baking dish with the stuffed shells.  When all of the shells are filled and in the dish, cover the shells with the remaining sauce, then bake for 20 minutes.  When the dish is finished baking, add a few extra tablespoons of grated parmesan and the remaining basil for a garnish.

Cumin Viniagrette

for 2, but you could easily double or triple the ingredients to serve a larger party

1/2 tsp. ground cumin

1/2 tsp. salt

1/4 tsp. black pepper

juice and zest of one lemon

1 1/2 Tbsp. olive oil

1 tsp. Dijon mustard

Shake or whisk the ingredients together, then add to a salad.  Here, I drizzled it over some salad greens, edible flowers, avocado, and pistachios.

wildcard wednesday: cheesy quinoa with power greens

Image

Greetings from the ice storm, or something like it!  Alex and I have both had the day off because of the threat that the roads could be icy, so other than a jaunt to Pure Barre, I’ve been reacquainting myself with our sofa, blankets, cats, and the almighty Netflix.  Luckily I had already purchased the ingredients for this week’s Wildcard Wednesday, so I knew that despite the icy rain, we’d be in for a treat with this week’s nutrient-rich comfort food.  Instead of good ol’ mac and cheese, we had cheesy quinoa with power greens.

I’ve cooked with quinoa (pronounced “keen-wah”) for the blog before, but let me just remind you of its nutrient-rich benefits.  One cup of quinoa has 24 grams of protein and 12 grams of fiber–MUCH more nutrient-dense than elbow macaroni.  I’ve also thrown in some power greens, more specifically the petite varieties of kale, swiss chard, and spinach.  These young greens fold in so smoothly and do not alter the smooth and creamy flavor that you crave with traditional mac and cheese.  I also used 2% milk and reduced fat cheese to cut down on the richness, but I promise you that this dish is plenty rich and will satisfy the masses.  I don’t pretend to know anything about child-rearing, but I even think that picky eaters would like this dish (yes, even with the greens).

You’ll notice from the photo that I topped this dish with a dash of crumbled bacon–yeah, I know, not too healthy sounding, right?  It’s certainly optional, but I cooked up a couple of slices to add a little bit of crunch and flavor.  A tiny bit of bacon never hurt anyone, can I get an amen?

Here are a few more photos and the almighty recipe:

Image

Cheesy Quinoa with Power Greens

3 Tbsp. butter

3 Tbsp. flour

1 1/2 cups 2% milk

7 oz. reduced fat sharp cheddar (get a block and shred it yourself–the pre-shredded stuff doesn’t melt as well)

1/2 tsp. salt

1/2 tsp. nutmeg

1 large shallot, minced

3 cups cooked quinoa (cook according to package directions–I cooked mine with chicken broth instead of water for added flavor)

4 oz. baby power greens (just use spinach if you can’t find a mix)

3/4 cup grated parmesan cheese

4 Tbsp. butter, melted

3/4 cup panko breadcrumbs

2 pieces of cooked bacon, crumbled (optional)

2 Tbsp. picked parsley leaves (optional)

Preheat oven to 350 F.  Melt 3 Tbsp. butter over medium heat in a large pan.  When butter is melted, whisk in flour to create a roux.  Slowly add the milk and increase the heat to medium-high.  Next, add the cheese, salt, nutmeg, and shallots.  Whisk until smooth, then turn off the heat.  In a large mixing bowl, mix the cooked quinoa, power greens, and cheese sauce together.  Pour into a casserole dish, dutch oven, or cast iron skillet (I used an 8-inch dutch oven, but didn’t use the lid).  Add the parmesan cheese evenly as a top layer.  Mix the melted butter with the panko breadcrumbs, then add this mixture evenly over the parmesan.  Bake for 20 minutes or until bubbly, then serve.