sides

meatless monday: parsnip souffle

souffle

Well, everyone. Tonight was one of those nights. It was one of those nights where the dish just didn’t measure up. Was it good? Yes. Was it attractive? Not really. Most importantly, despite the effort and ingredients, it just did not stand up as a complete dish.

Folks, I made a side that was masquerading as a main. Nonetheless, it is still a savory, tasty souffle that most of you will enjoy. It has the fresh, spicy taste of parsnip, and creaminess of cheese, the texture and protein of souffle, and even an unusual green from the CSA (Sorrel). It was a dish I would be proud to take to a dinner party or serve at a family dinner, even if it was not a full dinner for tonight. Which is to say, I still wanted you to know about it.

Being a souffle, it is mainly a dish of stuff mixed with eggs. The stuff in this case are pureed parsnips, onions, sorrel, and cheese with respective herbs. You can mix this up in numerous ways, including adding spinach, more cheese, other aromatics, or even ham.

Parsnip Souffle (adapted from epicurious.com)

1 pound parsnips, peeled, diced
glug olive oil
Salt, pepper
2 cups water

1/2 onion, frenched
1/2 cup sorrel, chopped
olive oil

1/4 stick butter
1/8 cup olive oil
1/4 cup flour
80z sharp cheddar, grated
Salt, pepper, paprika
1 tsp chopped sage

6 eggs, separated
1/4 tsp cream of tartar

shortening to coat dish

Heat oven to 400. Saute the parsnips in a pan with olive oil and salt and pepper. Heat until it begins to caramelize then pour in water. Stir well then put in oven for 10 minutes. Remove, drain and keep 1 cup of liquid. Puree in food processor. Place mix in fridge.

Heat more oil in a sauce pan and saute the onions. Add the sorrel and saute until wilted. Remove mix from pan and set aside.

Melt butter together with oil and add flour. Whisk together for a few minutes. Add the cooking liquid and continue to whisk for about 3 minutes, until thick as gravy, but smooth. Add the onions, sorrel, parsnip mix (from fridge), cheese and sage and spices. Stir together. Remove from heat.

Mix the egg whites and cream of tarter together at medium high speed of a mixer until stiff peaks form.

Meanwhile, stir the yolks into the parsnip mix. Once the whites and finished, slowly fold them into the parsnip mix. Pour into the shortening coated square dish and bake 35-40 minutes until set and golden brown.

Finish with grated Parmesan or extra cheddar if you choose.

… serve as side.

DSCN0636
Eggs

Eggs

Peaks

Peaks

Folded together

Folded together

Ready to go.

Ready to go.


lunchbox life: butter bean salad with pea shoots, chicken, and goat cheese

photo(10)Happy Sunday, everyone!  Alex and I enjoyed a lovely Saturday and Sunday morning on Lake Sinclair with some fine folks, and I hope that you had a great time with your friends and family.  Now that the weekend is winding down, it’s once again time to chronicle this next week’s lunches for Mrs. Morrison, your favorite US HIstory teacher.

I am so excited about this week’s lunchbox life, mainly because I relied on our trusty Dirt Farmers CSA box to show me the way.  We received a plethora of goodness this week, and I was particularly curious about what to do with the butter beans and lady peas.  Sure, I knew I could simmer them in some chicken stock and serve them as a side, but I wanted to do something a little different this time.  I’m using the bean/pea combo for both my lunches and for tomorrow night’s Meatless Monday, so stay tuned for butter beans and lady peas, part two.  You might recognize the butter beans in the photo, but the smaller peas alongside them are called lady peas or lady cream peas.  This Southern Living article does a great job at breaking down the differences in summer beans and peas, but suffice it to say that both of these lovelies are mild in taste and creamy in texture.

I also ordered pea shoots this week–pea shoots are a mild, delicate, and slightly bitter microgreen that add a nice pop of dark green to any salad.  I sliced up some radishes for color and a hint of spice.  I don’t care for raw red onion, but you could use some thinly sliced red onion or thinly sliced radishes here interchangeably. Also making appearances in this salad are chicken for protein, parsley and lemon juice for brightness, and goat cheese for…well, do you really need a reason for goat cheese?

I paired this salad with some chunks of white-fleshed sunburst melon from our CSA box.  It’s a lovely melon that looks like a cantaloupe, yet tastes like a cross between very ripe honeydew and cantaloupe.  Yum!

Butter Bean Salad with Pea Shoots, Chicken, and Goat Cheese

Serves 4-6 as a main dish or 8-12 as a side dish

2 1/2 cups fresh or canned butter beans and lady peas (or just butter beans)

4 cups chicken broth + 1 tsp. salt (if you’re using canned butter beans, you won’t need this)

about 10 sprigs fresh thyme (or about 2 tsp. dried thyme, only use if you’re using fresh beans)

2 chicken breasts, cooked, cut into cubes

8 oz. soft goat cheese, crumbled

1 cup pea shoots (substitute arugula, chopped, if you can’t find pea shoots)

2 Tbsp. chopped fresh parsley

4 radishes, thinly sliced

juice of 1 lemon

If using fresh beans: in a medium-sized pot, bring beans, broth, salt, and thyme to a boil and cook for about 20 minutes.  You can also do this in the rice cooker.

Combine cooked beans, chicken, goat cheese, pea shoots, parsley, radishes, and lemon juice in a large bowl.  Refrigerate for 4 hours or overnight and serve.

WW info: 5 servings, 8 PP each

lunchbox life: mexican quinoa bowls

image(48)Welcome back to school, gang!  Back to school means back to school lunches, so this is the official fourth semester of lunchbox life.  I started Instagram-ing my lunches in January 2013, then we started the blog in April 2013, so happy fourth semester of lunchbox life to everyone!

This week’s plan includes a stellar list of healthy and seasonal items: quinoa (the super grain), black beans, zucchini from our CSA, and local Silver Queen corn.  After an indulgent weekend of eating in Athens (watch for a blog post about that trip soon!), I knew I needed a restart in the healthy eating department.  The quinoa and black beans are excellent sources of protein in this meatless lunch, plus I’ve added mushrooms and Cotija cheese to round out this healthy and filling dish.

You could eat this bowl as a cold salad, or you could heat it in the microwave as a burrito bowl, or you could do both and figure out which way is your favorite throughout the week.  Today, I ate it cold and thought it was fantastic.  It has a pasta salad or rice salad feel, and the flavors from the Mexican seasoning really stand up to the ingredients in this dish.  As always, feel free to modify the recipe based on your preferences.  I added cilantro and green onion because I enjoy the brightness of flavor, but you could always leave them out or substitute fresh oregano or parsley.

WW info: 5 servings at 10 PP each–a complete meal, for sure!

Mexican Quinoa Bowls

1 1/4 cup quinoa, uncooked

3 cloves garlic

1 can black beans, drained and rinsed

1 large zucchini, diced

1/2 lb. white mushrooms, sliced

3 ears Silver Queen Corn

1 Tbsp. olive oil

1/2 tsp. red pepper flakes

zest of three limes (use juice in dressing)

4 oz. Cotija cheese, diced (you could also used crumbled queso fresco)

2 green onions, thinly sliced (optional)

1/2 cup cilantro, chopped (optional)

salt and pepper

Dressing:

juice of three limes

2 Tbsp. olive oil

2 Tbsp. organic taco seasoning (seriously buy the organic–the lack of extra preservatives is worth the extra cents)

Cook the quinoa according to package directions, and throw in the peeled garlic cloves to the pot or rice cooker.  Preheat the oven to 400 F.  Toss the diced zucchini and sliced mushrooms in the olive oil, red pepper flakes, and about 1/2 tsp. salt and 1/4 tsp. pepper.  Arrange them in a single layer on a cookie sheet and roast for 20 minutes, flipping the vegetables at the 10 minute mark.  Lightly char the corn on a grill pan, then slice the kernels off.

When the quinoa is cooked, add it to a large bowl along with the black beans, lime zest, corn kernels, zucchini, and mushrooms; toss to combine.  Next, add the dressing ingredients together and either whisk them in a small bowl or shake them in a small jar.  Add the dressing to the quinoa mixture and allow the quinoa to soak up the dressing.  Next, add the cheese, green onions, and cilantro.  Refrigerate for four hours or overnight.

meatless monday: simple southern summer supper

image(47)

Welcome back to Bungalow Kitchen, and let’s do the happy dance for the full return of Meatless Monday!  After a year-long class on Monday nights and a summer away at my beloved GHP, I am so incredibly glad to be back in the Monday groove.

Tonight’s Meatless Monday is a tribute to not only my childhood, but also the lives of plenty of southerners in the summertime: the veggie plate.  Dwellers of the American South are smacked in the face with heat and humidity all summer, but a silver lining of the oppressive heat is the gorgeous bounty of produce that comes from our summer rain soaked grounds.  This is a great secret of southern kitchens; while many people associate meat-heavy dishes with our region, particularly fried chicken, catfish, and barbecue, many of us know that when company isn’t coming, we feast on whatever is plentiful from the garden.  In tonight’s case, we enjoyed what was plentiful from our CSA box via The Dirt Farmers.  Meatless Monday is so easy when you have an elegant array of fruit and vegetables, plus it’s a blast to let the CSA box inspire and push you to try new food and preparation.  Tonight, I selected okra, the squash medley (one pattypan, one Mediterranean, and one eight ball zucchini), 1 heirloom tomato, and a small watermelon.  A welcome addition to our dinner was some cake-like, delectable cornbread gifted to us by our friends and neighbors, Lauren and Adam Ragusea, after Alex helped Adam remove a tree in his yard.  Can you get more southern than that?

Ok, so let’s begin with the okra.

image(42)

Preheat the oven to 400 F.  Take 1 lb. of fresh okra, slice it lengthwise, and place in a large mixing bowl.  Drizzle with 2 Tbsp. olive oil, 1 tsp. salt, 1/2 tsp. pepper, and 1/2 tsp. red pepper flakes and toss to combine.  Place okra on a cookie sheet in a single layer and roast for 20 minutes, flipping the okra at the 10 minute mark.  When it’s ready, take the okra out of the oven, place on a serving plate, and top with about 1/4 cup shaved parmesan cheese.

Next, let’s tackle the squash medley:

image(43)

Cut each squash into bite sized pieces, taking care to remove the seeds from the center of the pattypan squash and leaving the waxy skin on the squash.  In a large, heavy pan, melt 2 Tbsp. butter over medium high heat, adding 2 tsp. olive oil, 1/2 tsp. salt, and 4 crushed garlic cloves.  Let the garlic cook in the butter and oil for about 30 seconds, then add in the squash pieces and toss to combine.  Let the squash cook for about 5 minutes, stirring occasionally.  When the squash is cooked through (but not soggy), display it proudly on a serving plate and add about 2 Tbsp. of chopped fresh basil.

Next, let’s look at the pillow-like cornbread from Lauren and Adam with some honey butter from Southern Swiss Dairy out of Waynesboro, GA:

image(46)

It was nothing short of amazing.  Well done, Raguseas.  I’d like to point out that Adam, the cornbread’s creator, hails from Pennsylvania, but I’m guessing that he must have been below the Mason-Dixon line in a past life in order to create this masterpiece.

Let’s check out the heirloom tomato now:

image(44)

See this red and green misshapen thing?  That is a tomato.  Grocery store tomatoes pale in comparison to a ripe tomato that hasn’t been picked before its time, then shipped on a truck, then stuck on a display under fluorescent lights for days.  Tomatoes from a farm tell a story: their strange coloring, interior seed pattern, and exterior bumps and lumps tell you that they’re natural and the way the soil intended.  Slice one up, add salt and pepper, and maybe add a little bit of olive oil to gild the lily.

Now, for the watermelon:

image(45)

I don’t know if the watermelon or the cornbread was our dessert, but between the two, we were certainly satisfied.  Watermelon is gorgeous on its own, but add a piece of rind to your display dish for a nice look.

So that’s it, folks: I cooked the okra and squash, sliced up the tomato and watermelon, and enjoyed some cornbread from our sweet neighbors.  This meal is so quintessentially southern to me, but it’s a kitchen table, weeknight supper as opposed to a buffet of party food like barbecue or fried chicken or a “company is coming” dinner like honey baked ham or pork tenderloin.  Notice that nothing is fried in this healthy meal, but the ingredients call to the spirit of southern home cooks.  This kind of resourcefulness always reminds me of the resilience of our region, and I’m proud to pull down the veil of southern entertainment and let you in on the veggie plate secret.  Bon appetit, y’all!

image(41)

lunchbox life: roasted broccoli salad

Image

Happy last 2013-14 lunchbox life!  This section of the blog will be on hiatus until July (yes, we start school in late July), but this week’s lunch is so exciting that you could make it anytime, with or without a lunchbox.

Many of us have had broccoli salad before.  It’s usually mayonnaise-based with raw broccoli, golden raisins, chopped apples, and maybe some almonds.  It’s a great summer side dish for barbecue gatherings and cookouts.  A few weeks ago, I was at Fette Sau in Philadelphia, a much-cooler-than-me BBQ place in a hipster area of town, and I ordered broccoli salad as one of my sides, mostly out of curiosity.  I was so surprised with what they handed me as I went down the cafeteria-style line: this bowl of large pieces of cooled, roasted broccoli with a vinaigrette sauce.  What a great way to switch up the old stand by!  If you’ve ever roasted broccoli, you know that it completely changes the texture and taste of the cruciferous vegetable–the crunch remains, but it muted, and the taste is mellowed, yet deep.  Ever since my inspiration at Fette Sau, I’ve wanted to try my hand at an inspired dish.  Since I’m using the idea as a main dish, I’ve added a few ingredients to kick it up a notch: equal parts broccoli and cauliflower for color contrast, crispy bacon, soft goat cheese, tart dried cherries, crunchy cashews, and bright lemon zest.  I dressed the salad with my usual honey dijon vinaigrette and placed it on a bed of greens for volume.

Roasted Broccoli Salad

1 crown of broccoli

1 crown of cauliflower

1 Tbsp. olive oil

salt and pepper

5 slices of bacon

4 oz. soft goat cheese, crumbled

1/2 cup dried cherries

1/2 cup cashews, chopped

zest of two lemons

5 cups of salad greens

For the dressing:

1.5 Tbsp. olive oil

juice of two lemons

1 Tbsp. dijon mustard

1 tsp. honey

salt and pepper

Heat the oven to 400 F.  Give the broccoli and cauliflower a rough chop–you want the pieces to be between about 2 to 3 inches in length.  Place the broccoli and cauliflower in a mixing bowl and add 1 Tbsp. olive oil and salt and pepper to taste (1/2 tsp. salt, 1/4 tsp. black pepper is what I used), then mix to coat.  Spread the broccoli and cauliflower and an even layer on a cookie sheet, then roast for 15 minutes.  At the 15 minute mark, take the vegetables out and flip them over, then roast for another 15 minutes.  When the 30 minutes are up, place the roasted vegetables in a mixing bowl and set aside to cool to room temperature.  While the veggies are roasting, fry the pieces of bacon in a large frying pan to a crisp, then remove the bacon and place on a paper towel and let cool to room temperature.  When these items are cool enough, crumble the bacon over the broccoli and cauliflower, then add the goat cheese, dried cherries, and cashews.  Toss to combine.   In a small jar, combine the dressing ingredients, place the cap on tightly, shake to combine, then pour over the salad and toss to combine.  Serve the broccoli salad as a stand alone dish or on a bed of greens.

WW info: 9 PP per serving (5 servings in this recipe)

Image


lunchbox life: greek chicken with tomato, cucumber, and feta salad

Image


With only three Mondays left with students (yayyy!), lunchbox life is winding down year two and I am winding down year three of teaching.  This week’s lunches are a siren call to summer.  There is something about a tomato and cucumber salad that calls for a sunny day and warmer temperatures.  The salad is accompanied by some Greek-seasoned chicken breast, a dollop of hummus, some kalamata olives, all on a bed of spinach.

Greek Chicken for Salad

1 lb. chicken breast, cut into cubes

1.5 Tbsp. olive oil

1 lemon, thinly sliced

4 garlic cloves, minced

2 Tbsp. fresh oregano, chopped

salt and pepper to taste

Heat the olive oil in a pan to medium heat.  Add the lemon slices, garlic, oregano, salt, and pepper and let the flavors simmer for about 3 minutes.  Add the chicken, salt, and pepper and allow the chicken to cook through (about 6-10 minutes).  Set aside and let cool.

Tomato, Cucumber, and Feta Salad

8 Campari tomatoes (you could also use plum or cherry tomatoes)

1 English (seedless) cucumber (this is the one that is long, skinny, and wrapped in shrink wrap at the grocery store)

1 cup feta cheese, crumbled

4 Tbsp. chopped fresh parsley

juice of 1 lemon

salt and pepper to taste

Quarter the tomatoes, then remove the juice and seeds.  Dice the tomatoes and place them in a large mixing bowl.  Slice the seedless cucumber, then dice the slices into small squares; place the  cucumber pieces in the bowl.  Add the feta, parsley, lemon juice, and salt and pepper to the bowl and mix to combine.  Refrigerate for at least one hour before eating.

WW info: 10 points for 1 cup baby spinach, 2 Tbsp. hummus, 1/2 cup tomato and cucumber salad, 1/3 cup chicken, and about 8 olives.

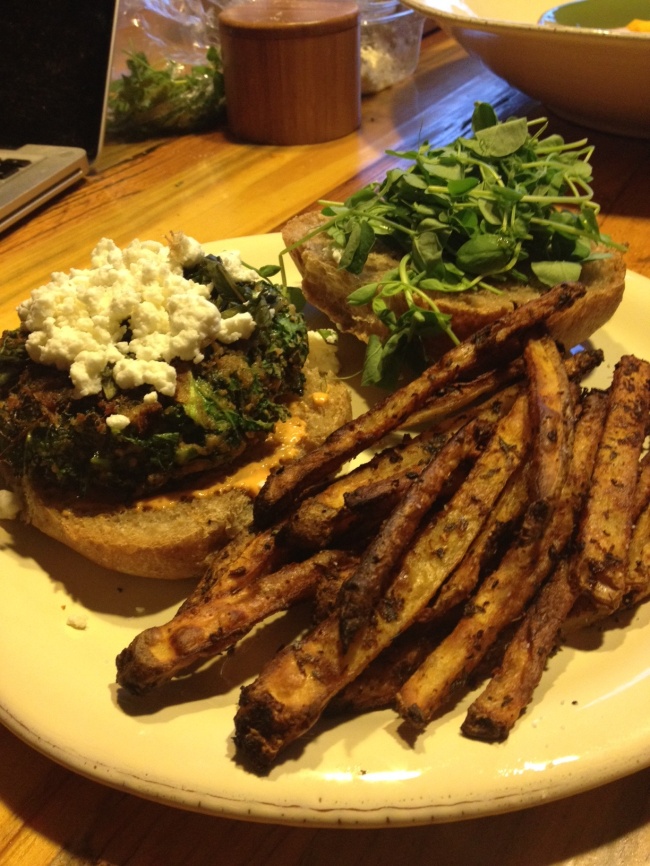
meatless monday: mushroom kale burgers with seasoned oven fries

Image

It’s back!  Meatless Monday has been on hiatus for most of the past school year because my Monday nights have been occupied by a year-long, once per week class as I work toward my gifted certification.  Since I’m on Spring Break this week (can I get a what what?), I decided to bring it back as a teaser for its fabulous return in mid-May.  Have you missed it?

For my first day of spring break, I woke up around 8 (sleeping in for a teacher), drank coffee and watched the Today Show, went to the grocery store, met my friend Lauren at Pure Barre, then ate popcorn for lunch as we watched Divergent at the movie theater.  I’d definitely call it a success.

I also had some time to peruse Pinterest and found a few different cool recipes for a mushroom kale burger.  The word “burger” is a misnomer here, but the word “patty” just sounds so…unappetizing?  Anyway, if you’re into black bean burgers or other veggie burgers, this is definitely a winner.  Every ingredient is intentional and natural, and it packs a huge nutritional punch.

The oven fries were a personal challenge.  I’m usually averse to baked fries because they just make me wish I had fried fries, but I am now a believer!  These fries are a Skinnytaste recipe, so I should have known they’d be great; Gina never gets it wrong.  I did change a couple of things though, as you’ll see below in the recipe.

Mushroom Kale Burgers

Serves 4

1 bunch kale

1 tsp. Kosher salt

2 portobello caps, stems and gills removed, cut into 1-inch pieces

1 tomato

1 Tbsp. almond butter

3 garlic cloves, peeled

1/2 tsp. cumin

1/2 tsp. paprika

1/2 tsp. cracked black pepper

1/2 tsp. Kosher salt

1/2 cup all purpose flour

1/2 cup breadcrumbs

2 Tbsp. canola oil

Rinse the kale with cold water, then remove stems from kale leaves and give the kale a rough chop into mini bite-size pieces.  Place the kale in a large mixing bowl, sprinkle with 1 tsp. salt, then massage the kale leaves with the salt (only about 30 seconds).  At first, you’ll think that this is way too much kale for four burgers, but you’ll see that it wilts slightly with the salt and folds in nicely with the other ingredients.  Quarter the tomato, remove the seeds, and place the quartered pieces in a food processor.  Add the mushrooms, almond butter, garlic, paprika, cumin, salt, and pepper, then pulse until smooth.  Add the flour and pulse again until smooth.  Fold the mushroom mixture into the kale in the large mixing bowl, then fold in the breadcrumbs.  Divide the mixture into four even amounts and, with you hands, form each amount into a patty shape.  Lightly sprinkle both sides with flour.  Heat the oil in a large, flat-bottomed pan over medium heat.  When the oil is hot, place the burgers in the pan and cook for about 5 minutes on each side.  Serve on a bun with any toppings you like–here, I used goat cheese, pea shoots, basil, and some sriracha mayo.

Seasoned Oven Fries

Adapted from Skinnytaste

Serves 2

2 medium potatoes

2 tsp. Kosher salt

2 tsp. olive oil

1 Tbsp. herbs de provence

zest of 1 lime; reserve the juice for the end

1/4 tsp. oregano

1 tsp. paprika

1/4 tsp. chili powder

1/4 tsp. onion powder

1/4 tsp. garlic powder

1 tsp. Kosher salt

1/4 tsp. cracked black pepper

Preheat the oven to 400 F.  Slice the potatoes lengthwise in 1/4-inch slices, then slice each slice vertically every 1/4-inch.  Place the raw fries in a colander over a mixing bowl and sprinkle the 2 tsp. salt evenly; let this sit for about 30 minutes.  This allows for some of the moisture from the potatoes to release, allowing for a crispier fry.  While the fries are dehydrating a bit, add all of the spices together in a small bowl and mix to combine.  When the 30 minutes are up, Combine the fries and olive oil in a mixing bowl, then add the spice mixture and toss to combine evenly.  Line a cookie sheet with aluminum foil, spray with cooking spray, then place the fries in a single layer.  Bake for about 25 minutes, turning the fries at the halfway mark.  When they are ready to eat, squeeze the lime juice over the fries for a kick.

I served these with sriracha mayo, which is just 1 part sriracha to 3 parts mayo (so 1 tsp. sriracha for every Tbsp. of mayo).

wildcard wednesday: shiitake, brussels, and carrot stuffed shells + salad with avocado and cumin viniagrette

Image Image

So, I’m still technically following the Wild Card Wednesday rule (use the theme or ingredient for the month), but the avocado was not center stage tonight.  I’m still on a high from our CSA delivery, and I couldn’t wait to use some more of those beautiful ingredients (shoutout again to my newest obsession, The Dirt Farmer CSA).  I thought about using some of these ingredients on a pizza or in a casserole bake, but then I had a throwback moment to one of my mom’s go-to weeknight suppers: stuffed shells.  I remember her boiling the pasta shells, then lining the cooked pieces on a paper towel on the counter while she mixed the filling and delicately placed a spoonful into each one.  She usually used ricotta and mozzarella for the filling and sometimes included some ground meat or sausage.   I decided to use some quick-sauteed veggies in my version mixed with part-skim ricotta and basil, and I think it turned out great!

The salad features some locally grown salad greens, a few edible flowers (a CSA throw-in this week and a total luxury), some avocado, a few pistachios, and the belle of the ball: cumin vinaigrette.  You might think that cumin only belongs in Mexican and Indian food, but add it to some lemon juice, zest, and some olive oil and you have a bright, complex flavor that works in fantastic contrast to the creamy avocado and crunchy pistachio.  This vinaigrette would be great on many salads and would also work nicely drizzled over a fatty fish like salmon or a lean skirt steak.  It’s so easy, and that you have to try it!  Don’t be afraid to make your own salad dressings.  If you have some olive oil, a small mason jar, and an imagination, the possibilities are endless.  Plus, a homemade dressing will always taste better than something out of a squeeze bottle.

Shiitake, Brussels, and Carrot Stuffed Shells

Serves 2 with leftovers

12 large pasta shells

1 cup part-skim ricotta cheese

8 to 10 brussels sprouts

1 large carrot (or about 10 very tiny carrots like the ones I received in my CSA box)

1 cup shiitake mushrooms

1 Tbsp. butter

28 oz. crushed tomatoes

4 garlic cloves, peeled and minced

1/4 cup grated parmesan cheese, plus more for a top off at the end

2 Tbsp. fresh basil cut in ribbons, separated into two 1-Tbsp. piles

salt and pepper

Preheat the oven to 400 F.  Cook the pasta according to package directions, remove from boiling water, then set aside on a paper towel to cool.  While the water is boiling and pasta is cooking, work on prepping the vegetables: Thinly slice the brussels sprouts by placing each one stem side up, then thinly slicing the sprout on all four sides (you’ll be left with the dense core to throw out).  Peel the carrots into thin ribbons with a vegetable peeler.  Add the shiitake mushrooms to the chopped brussels and carrots.  Heat a medium frying pan over medium-high heat and melt the butter, then add the veggies with 1 tsp. salt and a few grinds of black pepper.  Gently toss the veggies in the warm butter, then continue to stir every 30 seconds or so until the veggies cook through a bit (about three minutes) but do not lose all of their crunch.  Set aside to cool.  While the veggies are cooling, heat the crushed tomatoes in a small saucepan over medium heat with the minced garlic and 1 tsp. salt.  When the veggies are warm but not longer hot, add the ricotta, parmesan, and 1 Tbsp. of the basil, then stir to combine.  Using a small baking dish, add about 1/2 cup of the tomato sauce to the bottom of the dish.  Next, fill each pasta shell with about 1/4 cup of the ricotta-veggie mixture and line the baking dish with the stuffed shells.  When all of the shells are filled and in the dish, cover the shells with the remaining sauce, then bake for 20 minutes.  When the dish is finished baking, add a few extra tablespoons of grated parmesan and the remaining basil for a garnish.

Cumin Viniagrette

for 2, but you could easily double or triple the ingredients to serve a larger party

1/2 tsp. ground cumin

1/2 tsp. salt

1/4 tsp. black pepper

juice and zest of one lemon

1 1/2 Tbsp. olive oil

1 tsp. Dijon mustard

Shake or whisk the ingredients together, then add to a salad.  Here, I drizzled it over some salad greens, edible flowers, avocado, and pistachios.

wildcard wednesday: cheesy quinoa with power greens

Image

Greetings from the ice storm, or something like it!  Alex and I have both had the day off because of the threat that the roads could be icy, so other than a jaunt to Pure Barre, I’ve been reacquainting myself with our sofa, blankets, cats, and the almighty Netflix.  Luckily I had already purchased the ingredients for this week’s Wildcard Wednesday, so I knew that despite the icy rain, we’d be in for a treat with this week’s nutrient-rich comfort food.  Instead of good ol’ mac and cheese, we had cheesy quinoa with power greens.

I’ve cooked with quinoa (pronounced “keen-wah”) for the blog before, but let me just remind you of its nutrient-rich benefits.  One cup of quinoa has 24 grams of protein and 12 grams of fiber–MUCH more nutrient-dense than elbow macaroni.  I’ve also thrown in some power greens, more specifically the petite varieties of kale, swiss chard, and spinach.  These young greens fold in so smoothly and do not alter the smooth and creamy flavor that you crave with traditional mac and cheese.  I also used 2% milk and reduced fat cheese to cut down on the richness, but I promise you that this dish is plenty rich and will satisfy the masses.  I don’t pretend to know anything about child-rearing, but I even think that picky eaters would like this dish (yes, even with the greens).

You’ll notice from the photo that I topped this dish with a dash of crumbled bacon–yeah, I know, not too healthy sounding, right?  It’s certainly optional, but I cooked up a couple of slices to add a little bit of crunch and flavor.  A tiny bit of bacon never hurt anyone, can I get an amen?

Here are a few more photos and the almighty recipe:

Image

Cheesy Quinoa with Power Greens

3 Tbsp. butter

3 Tbsp. flour

1 1/2 cups 2% milk

7 oz. reduced fat sharp cheddar (get a block and shred it yourself–the pre-shredded stuff doesn’t melt as well)

1/2 tsp. salt

1/2 tsp. nutmeg

1 large shallot, minced

3 cups cooked quinoa (cook according to package directions–I cooked mine with chicken broth instead of water for added flavor)

4 oz. baby power greens (just use spinach if you can’t find a mix)

3/4 cup grated parmesan cheese

4 Tbsp. butter, melted

3/4 cup panko breadcrumbs

2 pieces of cooked bacon, crumbled (optional)

2 Tbsp. picked parsley leaves (optional)

Preheat oven to 350 F.  Melt 3 Tbsp. butter over medium heat in a large pan.  When butter is melted, whisk in flour to create a roux.  Slowly add the milk and increase the heat to medium-high.  Next, add the cheese, salt, nutmeg, and shallots.  Whisk until smooth, then turn off the heat.  In a large mixing bowl, mix the cooked quinoa, power greens, and cheese sauce together.  Pour into a casserole dish, dutch oven, or cast iron skillet (I used an 8-inch dutch oven, but didn’t use the lid).  Add the parmesan cheese evenly as a top layer.  Mix the melted butter with the panko breadcrumbs, then add this mixture evenly over the parmesan.  Bake for 20 minutes or until bubbly, then serve.

wild card wednesday: fish skewers with hawayej and parsley + roasted cauliflower and hazelnut salad

Image

Happy Wednesday, all!  Today marks the middle of January, my least favorite month.  It’s cold, there are no major celebrations, and it’s dark too early, just to name a few gripes.  Despite all of this, we must soldier on and make the best out of what we have, which brings me to the Wild Card Wednesday ingredient of the month: cauliflower.  Yes, that dreaded white, crunchy vegetable on every crudite plate that is never eaten.  Some of you may know about the transformative properties of roasting vegetables, and cauliflower performs beautifully in this endeavor.  Like January, no one likes cauliflower upon first blush, but since we have to live with it, we might as well enjoy it, right?

Both of these recipes come from the cookbook Jerusalem, written by Yotam Ottolenghi and Sami Tamimi.  Both men were born in Israel, but Ottolenghi is Jewish and Tamimi is Muslim.  Together, they own a handful of delis in London and combine many tastes and flavors from all around the Middle East.  I was so excited to open this, along with another one of their cookbooks, Plenty, at Christmas this year.  My cousin Jessy (paying close attention to my Amazon wishlist) made an excellent choice!

The fish skewers have a strong depth of flavor–something that usually doesn’t come across with grilled fish.  It sits in the refrigerator in the hawayej–a Yemeni spice mix that you make from your pantry–and the flavor seeps into the filets very effectively.  The cauliflower salad is a true “party in your mouth” type of side dish; lots of interesting textures come out from the softness of the roasted cauliflower, the fruity pop of the pomegranate seeds, and crunch of the nuts and the celery.

So, here we go: a warm, vibrant, piquant plate for a dreary mid-week day in the doldrums.  Just the pick-me-up you needed!

Fish Skewers with Hawayej and Parsley

1 lb. (2 fillets) cod, halibut, or other firm white fish, cut into 1-inch cubes

1 cup chopped parsley

2 garlic cloves, crushed

1/2 tsp. red pepper flakes

1 Tbsp. olive oil

1 lemon, halved

4 bamboo skewers, soaked in water for 1 hour

Hawayej Spice Mix:

1 tsp. black peppercorns

1 tsp. coriander seeds

1 1/2 tsp. cumin seeds

4 whole cloves

1/2 tsp. ground cardamom

1/2 tsp turmeric

Start with the hawayej mix: place all of the mix ingredients into a spice grinder or use a mortar and pestle to grind the spices into an even mix.  Place the mix into a large mixing bowl.  Place fish, parsley, garlic, red pepper flakes, lemon juice, and 1 tsp. of salt into the bowl with the hawayej mix.  Mix well with your hands, then cover with plastic wrap and let fish sit for at least one hour in the refrigerator.

Place a ridged grill pan over high heat for about five minutes.  While you’re waiting for the grill pan to get hot, thread the fish pieces onto the bamboo skewers, leaving plenty of space between each piece (about four on each skewer).  Drizzle the fish with a small amount of olive oil, then grill for about 2 minutes on each side.  Grill the lemon halves and serve on the plate with the skewers.

Roasted Cauliflower and Hazelnut Salad

1 head cauliflower, broken into smaller florets

4 Tbsp. olive oil

1 large celery stalk, cut on an angle into 1/4-inch slices

5 Tbsp. hazelnuts, with skins

1/3 cup parsley leaves, picked

1/3 cup pomegranate seeds

1/4 tsp. ground cinnamon

1/4 tsp. allspice

1 Tbsp. sherry vinegar

1 1/2 tsp. maple syrup

salt and cracked black pepper

Preheat oven to 425 F.  Mix the cauliflower with 2 Tbsp. olive oil, 1/2 tsp. salt, and some black pepper.  Spread the florets evenly in a roasting pan or on a cookie sheet and roast on the top oven rack for about 30 minutes, until the cauliflower is crisp and parts of it have turned golden brown.  Transfer to a large mixing bowl and set aside to cool down.

Turn the oven temperature down to 325 F.  Spread the hazelnuts on a baking sheet lined with parchment paper and roast for about 10 minutes.  Allow the nuts to cool slightly, then chop and add to the cauliflower.  Add another Tbsp. of olive oil along with the remaining ingredients.  Serve at room temperature.